Showing posts with label DIY. Show all posts

Wednesday, June 6, 2012

How to make an easy center piece for parties

Slam Alikom,
Today,I wanna share with you a very easy to make project.It is a Tissue paper flower center piece for any party.
The tools required for this project are very simple and you may have most of them already at home.

Here is the center piece photo:


Ok, Let's Start.
First we need The following materials:
1-Glasses cup "The one that I used here is really cheap,I think it was $1 or less from target".
2-Ribbon "matched with the color theme".
3-Styrofoam ball "I used a 2inches one".
4-10" inches Floral wire 24 or 22 Gauge "I used 26 Gauge but it was very thin and hard to push it through the foam ball".
5-Tissue paper "you can use one color up to 4 or 5 colors".
6-Embellishments "I used two paper punched flowers".


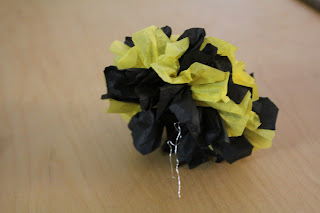
Step1: Make the Tissue paper flower:
Sorry that I didn't take a step-by-step photos for making the flower, but here is a video tutorial for it
Follow all the steps she made in the video but instead of using thread we will use the floral wire

The flower with the Wire in the middle.

 Step2: Push the flower wire tail into the foam ball


Step 3:Put the Ball inside the glasses cup.


Step 4: Adhere the ribbon to the cup and add your embellishments.
I used double sided tape for this step.


Step5 "Optional" :
 I cut very tiny pieces of black paper and put it in the bottom of the cup to give it a nice shade.


I punched some paper circles confetti and sprinkled them around the center piece.

Hope you Like it.
Thanks for stopping by.


Monday, May 7, 2012

Styrofoam ball pen holder

Slam Alikom All,

Today, I wanna share with you a very easy DIY project.

A Styrofoam ball pen holder.

Materials needed:
1-Styrofoam ball
2-hot glue gun
3-Small  jar lid "I used the lid of Gerber baby food Jar.
4-Ribbon.


Steps:
1-Use the pen" that you will put later in the holder" to make a hole in your foam ball, just take the pen and push it through the ball but don't make it so deep though.

2-Use your hot glue gun and glue the ball to the Jar lid.
3- Test the stability of your holder now, do that by putting the pen in the holder and see if it could stand alone or not,if it is not stable try to adjust the hole again but moving your pen in the hole to the side a little bit.
4-Now your holder is ready and you only need to embellish it with ribbon and stickers of your choice.
5- Use your glue gun to glue the ribbon around the ball try to cover the Jar lid and the edge between the ball and the Lid.


The Jar Lid

The Styrofoam ball after making the hole

Glue the ball to the Lid

test the stability 

The holder after gluing the ribbon, I used to colors here,then I used some paper flowers as embellishments 

close view of the holder.

Easy ha?!!

hope you all like it and give it a try too :)
Thanx for stopping by.


Sunday, April 22, 2012

Handmade Photo Frames

Slam Alikom,

Today I wanna share this new project with you.

I have this black photo frame which is divided into 8 photo sections, I love it coz it has plenty of space to show more photos, but in the other side I couldn't find any other frames that could go with it without overcrowding the wall.

Then I thought...Why not to make the frames myself???
I opened my Huge Scrap box and stated to search for the good materials that could work for this project, some foam boards, cereal boxes, scrapbook papers and some embellishments like buttons and ribbons.

This project is super easy, all you have to do is:
1-Cut the old box into squares or rectangles "the size you prefer".
2-cut your scrapbook paper into the same size as the previous squares.
3-I used mod podge to glue the papers to the squares but you can use any glue you have.
4-Print your photos then glue it to the squares.
5-Decorate your frames with your embellishments .
6- Punch some holes to attach the ribbon to them.
6-Hang them to your wall :)

I made two squares and a scalloped rectangle for each frame, then connected them using  ribbon.

Here They are....


My Wall with the big black Frame only.


With my new Frames.


Thanx for stopping by :)

 
Copyright 2009 NoahScraps. Powered by Blogger
Blogger Templates created by Deluxe Templates
Blogger Showcase