Showing posts with label Tutorials. Show all posts

Monday, February 18, 2013

Ikea latt Mickey Mouse table makeover


I think most of you already have seen this Ikea table before, It is called Ikea Latt children table with chairs
I preferred to buy this on because we didn't like the colors of the other kids table known as "Mamut children table", But as you see, it is just solid wood and has no color at all,so I was thinking of a makeover.
I searched the Internet and their are such amazing makeovers their and they all inspired me a lot, but I wanted to make a Mickey mouse themed table cuz it is my son's favorite character so here is what I did
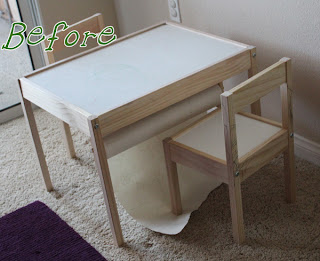

Before
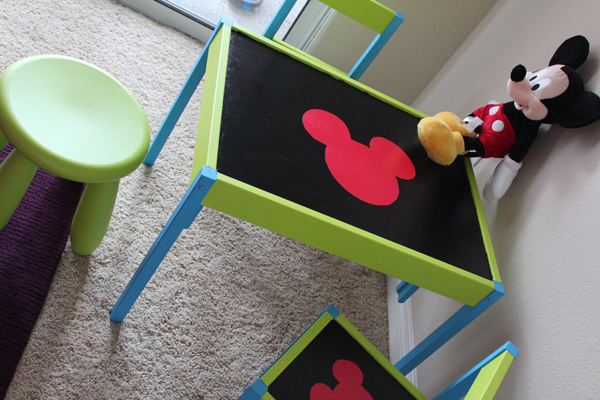
                                                                         After

Here are the steps.
First, what we need:


1- Behr premium plus paints
    I used two colors both of them was mixed with the primer,SO you don't need the priming step.
2-Martha stewart craft paint for the table and chairs top
        I used "Holly berry" pearl color for mickey mouse face, and "Beetle Black" High Gloss 
3-ScotchBlue Advanced Multi-Surface Painter's Tape.
4-Foam brush 
       I used one for each color except the Red color,so I used 3.
5-Fine brush for painting the face.
6-Vinyl transfer sheet.
7-Paper plate

Steps:
I used to main colors for the table, "Lime pop" and Tropical Holiday,I bought them from Home depot for $2,5 each,and as I said they have the Primer in it so I don't have to buy Primer.
To apply the first color "Blue",  I masked all the area that I don't want to be painted Blue


I applied three coats for each color,this paint really dry fast so I started with the new coat just after finishing the 3 pieces.
After the third coat I waited for 1 hr  or more then I removed the tape and masked the table and chairs again for the "Green" color.
Noah is helping me removing the Tape :)
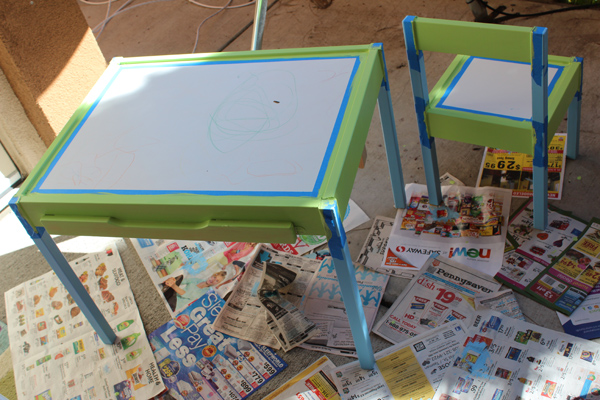

After applying the Green color.

Now for the Table and chairs top:
I had Vinyl transfer sheets from previous project so I decided to use it as a mask for the Mickey Mouse face,so I used me Cricut Machine to cut 3 faces,2 for the chairs and one for the table.
If you have any cutting machine you can use this photo to cut it
I use Surecuts a lot program, So I traced the Image and start sizing it.
For the Table,I cut the face 11''*11" inches, and for the Chairs 6"*6 inches,If you don't have a cutting machine you can print it in those sizes then trace them on the transfer sheet.

Then I paste the faces on the center of the table and chairs top


Make sure there is no bubbles at the edges of the face as we don't need any black color leaking under the face.
Now apply the Black color,the first coat will look so bad cuz It will show lots of brush strokes, but don't worry they will be covered after the third coat.

Please be careful, the drying time for Martha Stewart paint is 1hr at least,plz don't start a new coat before 1h.
Now remove the face masks and start painting the face with the fine brush, I made two coats only.

After I finished all the painting I used the fine brush to cover any mistakes like the areas in the photo here.

I bought "Mod Podge Pearlized Acrylic Sealer"  to finish the project, but I suggest you use the "Super Hi-Shine Clear Acrylic Sealer" as the pearlized one gives a cover of silver color and I didn't like that 

                                                    
                                                           Mod Podge Pearlized Sealer


                                                                       Super Gloss

And that's it, Here is the finishing Product 
                                                                           Before


  Hope you Like it.

Wednesday, June 6, 2012

How to make an easy center piece for parties

Slam Alikom,
Today,I wanna share with you a very easy to make project.It is a Tissue paper flower center piece for any party.
The tools required for this project are very simple and you may have most of them already at home.

Here is the center piece photo:


Ok, Let's Start.
First we need The following materials:
1-Glasses cup "The one that I used here is really cheap,I think it was $1 or less from target".
2-Ribbon "matched with the color theme".
3-Styrofoam ball "I used a 2inches one".
4-10" inches Floral wire 24 or 22 Gauge "I used 26 Gauge but it was very thin and hard to push it through the foam ball".
5-Tissue paper "you can use one color up to 4 or 5 colors".
6-Embellishments "I used two paper punched flowers".


Step1: Make the Tissue paper flower:
Sorry that I didn't take a step-by-step photos for making the flower, but here is a video tutorial for it
Follow all the steps she made in the video but instead of using thread we will use the floral wire

The flower with the Wire in the middle.

 Step2: Push the flower wire tail into the foam ball


Step 3:Put the Ball inside the glasses cup.


Step 4: Adhere the ribbon to the cup and add your embellishments.
I used double sided tape for this step.


Step5 "Optional" :
 I cut very tiny pieces of black paper and put it in the bottom of the cup to give it a nice shade.


I punched some paper circles confetti and sprinkled them around the center piece.

Hope you Like it.
Thanks for stopping by.


Monday, May 7, 2012

Styrofoam ball pen holder

Slam Alikom All,

Today, I wanna share with you a very easy DIY project.

A Styrofoam ball pen holder.

Materials needed:
1-Styrofoam ball
2-hot glue gun
3-Small  jar lid "I used the lid of Gerber baby food Jar.
4-Ribbon.


Steps:
1-Use the pen" that you will put later in the holder" to make a hole in your foam ball, just take the pen and push it through the ball but don't make it so deep though.

2-Use your hot glue gun and glue the ball to the Jar lid.
3- Test the stability of your holder now, do that by putting the pen in the holder and see if it could stand alone or not,if it is not stable try to adjust the hole again but moving your pen in the hole to the side a little bit.
4-Now your holder is ready and you only need to embellish it with ribbon and stickers of your choice.
5- Use your glue gun to glue the ribbon around the ball try to cover the Jar lid and the edge between the ball and the Lid.


The Jar Lid

The Styrofoam ball after making the hole

Glue the ball to the Lid

test the stability 

The holder after gluing the ribbon, I used to colors here,then I used some paper flowers as embellishments 

close view of the holder.

Easy ha?!!

hope you all like it and give it a try too :)
Thanx for stopping by.


Sunday, April 22, 2012

Handmade Photo Frames

Slam Alikom,

Today I wanna share this new project with you.

I have this black photo frame which is divided into 8 photo sections, I love it coz it has plenty of space to show more photos, but in the other side I couldn't find any other frames that could go with it without overcrowding the wall.

Then I thought...Why not to make the frames myself???
I opened my Huge Scrap box and stated to search for the good materials that could work for this project, some foam boards, cereal boxes, scrapbook papers and some embellishments like buttons and ribbons.

This project is super easy, all you have to do is:
1-Cut the old box into squares or rectangles "the size you prefer".
2-cut your scrapbook paper into the same size as the previous squares.
3-I used mod podge to glue the papers to the squares but you can use any glue you have.
4-Print your photos then glue it to the squares.
5-Decorate your frames with your embellishments .
6- Punch some holes to attach the ribbon to them.
6-Hang them to your wall :)

I made two squares and a scalloped rectangle for each frame, then connected them using  ribbon.

Here They are....


My Wall with the big black Frame only.


With my new Frames.


Thanx for stopping by :)

Tuesday, November 29, 2011

Recycled Container

I had this coffee mate big container several times and always want to recycle it but I never did.
This Time I decided to use my "mod podge glue" and reuse this big container.

This is a picture of the " "mod podge glue"
Here is some details about this glue for those who are interested .
http://easycrafts.wikia.com/wiki/Mod_Podge

Back to my recycling project, less talk and more pictures

The container.


After applying the first layer of mod podge.
                                                      The glue is white at the beginning but It dries clear.


1-I cut some papers to cover the container with, 
actually I wanted to get rid of some paper scraps so I used two colors :).

2-Let the glue dry for about 10 minutes before the next step "for best results".


3- Between the two colored papers ,I used this ribbon to cover any gab between them.
4-let it dry and then apply the LAST layer of "mod podge" .
This step is IMPORTANT, cuz This layer is a coat for ur paper to protect it .

You can use any embellishments u like, flowers, stickers... etc  

and here is my new container , I'm using it as a kitchen utensils container,it really helps :)


Copyright 2009 NoahScraps. Powered by Blogger
Blogger Templates created by Deluxe Templates
Blogger Showcase