I think most of you already have seen this Ikea table before, It is called Ikea Latt children table with chairs
I preferred to buy this on because we didn't like the colors of the other kids table known as "Mamut children table", But as you see, it is just solid wood and has no color at all,so I was thinking of a makeover.
I searched the Internet and their are such amazing makeovers their and they all inspired me a lot, but I wanted to make a Mickey mouse themed table cuz it is my son's favorite character so here is what I did
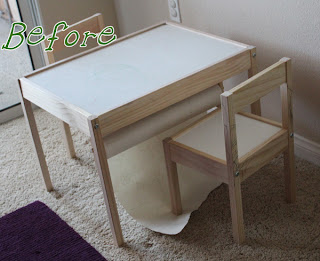
Before

Here are the steps.
First, what we need:

1- Behr premium plus paints
I used two colors both of them was mixed with the primer,SO you don't need the priming step.
2-Martha stewart craft paint for the table and chairs top
I used "Holly berry" pearl color for mickey mouse face, and "Beetle Black" High Gloss
3-ScotchBlue Advanced Multi-Surface Painter's Tape.
4-Foam brush
I used one for each color except the Red color,so I used 3.
5-Fine brush for painting the face.
6-Vinyl transfer sheet.
7-Paper plate
Steps:
I used to main colors for the table, "Lime pop" and Tropical Holiday,I bought them from Home depot for $2,5 each,and as I said they have the Primer in it so I don't have to buy Primer.
To apply the first color "Blue", I masked all the area that I don't want to be painted Blue


I applied three coats for each color,this paint really dry fast so I started with the new coat just after finishing the 3 pieces.
After the third coat I waited for 1 hr or more then I removed the tape and masked the table and chairs again for the "Green" color.

Noah is helping me removing the Tape :)
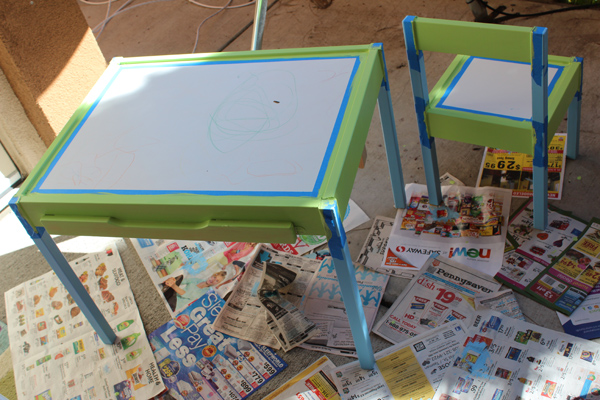

After applying the Green color.
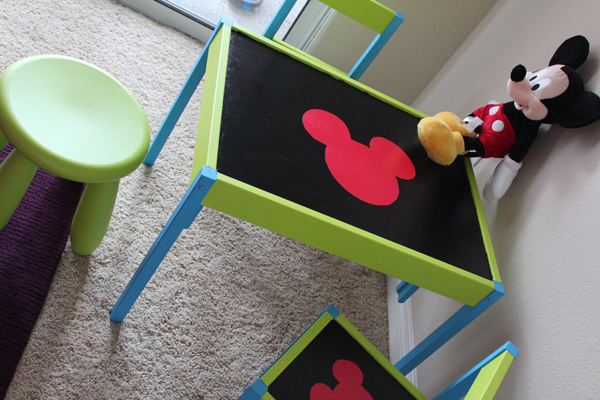
Now for the Table and chairs top:
I had Vinyl transfer sheets from previous project so I decided to use it as a mask for the Mickey Mouse face,so I used me Cricut Machine to cut 3 faces,2 for the chairs and one for the table.
If you have any cutting machine you can use this photo to cut it

I use Surecuts a lot program, So I traced the Image and start sizing it.
For the Table,I cut the face 11''*11" inches, and for the Chairs 6"*6 inches,If you don't have a cutting machine you can print it in those sizes then trace them on the transfer sheet.
Then I paste the faces on the center of the table and chairs top


Make sure there is no bubbles at the edges of the face as we don't need any black color leaking under the face.
Now apply the Black color,the first coat will look so bad cuz It will show lots of brush strokes, but don't worry they will be covered after the third coat.
Please be careful, the drying time for Martha Stewart paint is 1hr at least,plz don't start a new coat before 1h.
Now remove the face masks and start painting the face with the fine brush, I made two coats only.

After I finished all the painting I used the fine brush to cover any mistakes like the areas in the photo here.
I bought "Mod Podge Pearlized Acrylic Sealer" to finish the project, but I suggest you use the "Super Hi-Shine Clear Acrylic Sealer" as the pearlized one gives a cover of silver color and I didn't like that

Mod Podge Pearlized Sealer

Super Gloss
And that's it, Here is the finishing Product


Hope you Like it.


4 comments:
Amazing work! it looks wonderful mashAllah!
Yomna
جميله جدل ما شاء الله. عقبال يارب ما تعملي اختها في الهرم. يسرا
Thank you very much Yomna :)
ربنا يخليكي ليا يا احلي سوسو فالدنيا ويارب نعمل سوا للنونو بتاعك انتي هعمله احلي شغل
Post a Comment